Upcycle a Dresser into a Modern Vanity
There’s an undeniable allure to transforming something old into a statement piece brimming with personality and function. The trend of DIY dresser makeup desks isn’t just a flash-in-the-pan—it's a creatively rewarding way to upcycle a dresser into a vanity that feels customized and current. With a few key upgrades—fresh paint, new hardware, strategic lighting, and organization—any outdated piece can become the glam station of your dreams. Whether you crave a Pinterest-worthy beauty corner, a practical morning prep zone, or a lavish Hollywood-style vanity, converting a dresser is your ticket to a one-of-a-kind masterpiece. Today, I’m sharing an expert-inspired, step-by-step guide to help you make over your own dresser into a showstopping vanity.
Selecting the Right Dresser
Before you grab a paintbrush or sketch your perfect vanity (don’t worry, we’ll get there!), the foundation of your upcycling adventure rests on the dresser you choose. This isn’t just a practical step—it’s the heartbeat of your transformation. Let’s uncover what you should look for to ensure your project dazzles, from structure to size to style.
Start With Your Space
Measure the area you want your vanity to live in. Is it a nook in your bedroom, a roomy closet, or front and center in your beauty room? Remember, vanities don’t just serve as a surface for makeup and skincare—they often become design focal points. Choose a dresser whose width and depth won’t swallow the space or leave you with awkward gaps on the sides. A shallow, mid-century dresser is a sleek option for compact rooms, while a stately six-drawer chest might command attention in a spacious suite.
Assess the Dresser's Structure
Upcycling is infinitely easier if you start with a piece in solid shape. Pull out each drawer: do they glide smoothly? Are the sides and corners sturdy? Check for wobbling frames, water stains, or musty odors—these issues are difficult to fix. While a little cosmetic damage is no problem, deep structural faults can complicate your project. Look for a real-wood or MDF dresser over laminate options; the surface will accept paint more beautifully, lasting longer and feeling more luxe once transformed into your modern vanity.
Configuration Matters
Think about how you’ll use your DIY dresser makeup desk. Will you need wide drawers for palettes and styling tools, or are smaller compartments your preference for effortless organization? Low, horizontal dressers provide ample surface space for products and a full-size mirror. If your morning routine involves lots of sitting, ensure the center area is open beneath—so you can comfortably slide in a stool or chair. Some transformative hacks involve taking out a middle drawer to create a knee-space. Visualize your ideal glam station and let that guide your choice.
Don’t Be Afraid to Mix Styles
Maybe your favorite piece is a bit traditional for the crisp, modern vanity you crave. No worries! Paint, new hardware, and curated décor can completely shift a dresser’s vibe from vintage to sleek. Antique finds, Facebook Marketplace bargains, or a family heirloom—any can become your signature glam piece with a little creativity and elbow grease.
Once you’ve hunted down the perfect dresser, you’re ready for the fun part: making it modern.
Surface and Hardware Upgrades
Turning your dresser into a vanity is where the magic—and most of the personality—happens. The transformation starts with a refresh of the finish, the hardware, and those special little touches that make your new makeup desk feel elevated and truly yours. Let’s dive into proven tips to refinish, paint, and accessorize for show-stopping results.
Prep for Paint Perfection
A flawless finish begins with meticulous prep. Remove every drawer and unscrew existing hardware. If the dresser has an old finish—glossy, chipped, or stained—give it a gentle sanding. Start with a medium-grit sandpaper to knock down imperfections, then finish with a fine-grit for silky smoothness. Don’t forget the details: sand gently along moldings, corners, and the sides of each drawer.
After sanding, wipe every surface with a tack cloth to eliminate dust—don’t cut corners here, as a clean base ensures long-lasting, even paint.
Choose a Modern Finish
Your vanity's color will set the mood every morning. Crisp whites, tranquil grays, and bold blacks remain perennial favorites for their timeless appeal, while high-gloss hues (think blush, emerald, or navy) pack a glam punch. Use a high-quality furniture paint, applying primer first for deep pigments or painting over dark wood. Two to three thin coats with ample drying time between ensures a professional, smooth finish.
For a luxury twist, add metallic accents. Gild drawer edges with gold leaf, stencil a pattern, or paint the dresser’s legs in a gleaming brass. If you dream of a marble effect, peel-and-stick marble vinyl atop the dresser gives instant, wipe-clean glam without fuss.
Upgrade Your Hardware
This is where your upcycle dresser into vanity journey becomes truly custom. Outdated knobs and pulls can instantly age a piece, but swapping them out is a simple yet transformative step. Crystal knobs, chic brushed brass pulls, and geometric matte black handles all echo today’s most-wanted looks. You’ll be amazed how new hardware can make the entire piece feel like it’s fresh from a high-end showroom.
When choosing new hardware, consider your mirror and lighting finishes for a cohesive appearance. A tip? Lay out your selections on the vanity top to see how they pair before drilling any new holes. If you love a coordinated, fashion-forward look, see this option for trendy vanity handles and inspiration.
Mini-Makeover Touches
Want to elevate your DIY dresser makeup desk even further? Line the drawers with velvet or a peel-and-stick decorative liner. Add a glass top for a luxe, easy-to-clean surface—perfect for beauty product spills and morning coffee mugs. Or mount delicate brass feet beneath the dresser to add instant height and drama while protecting hardwood floors.
Now that your base is a modern work of art, you’re ready to transform your dresser to glam station status by focusing on those all-important mirrors and lights.
Adding Lighting and Mirrors
No modern vanity is complete without functional, flattering lighting and a statement mirror. These elements aren’t just decorative—they turn your upcycled dresser into a genuine glam station, worthy of every morning ritual. Beautiful lighting and a thoughtfully chosen mirror amplify every detail of your design, giving you the perfect canvas for skincare, makeup, and hair styling.
Why Proper Lighting Matters
Natural daylight is the gold standard, but most bedrooms or beauty corners need an extra boost. Bright, even light ensures you catch every detail, avoid makeup mishaps, and set the tone for your entire routine. The trick? Layered lighting.
- Tabletop LED Vanity Lights: These are easy to attach to your dresser top or along the sides of your mirror. Look for options with adjustable color temperature—cool white for true-to-life makeup, or warmer tones for a golden-hour glow. Strip-style LEDs are budget-friendly and energy efficient.
- Clip-On or Mounted Sconces: Hardware stores now offer chic plug-in sconces you can mount on either side of your new vanity mirror. Aim for placement at eye-level to minimize shadows and ensure your look is always on point.
- Statement Lamps: A pair of petite, glam table lamps or a clear acrylic lamp with a metallic base can add drama and polish. For a less permanent solution, opt for battery-operated puck lights or fairy string lights for soft, diffused ambience.
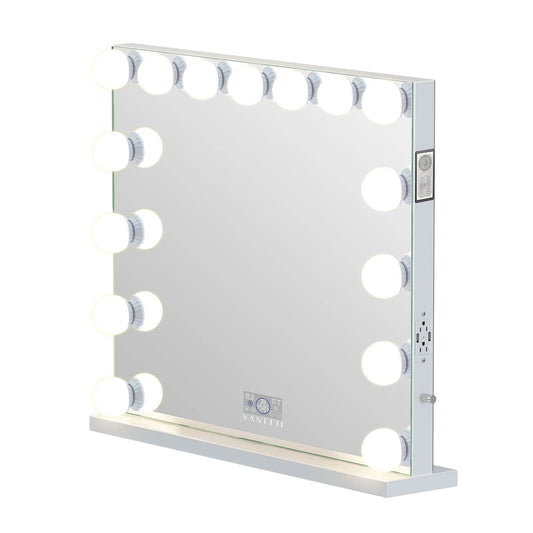
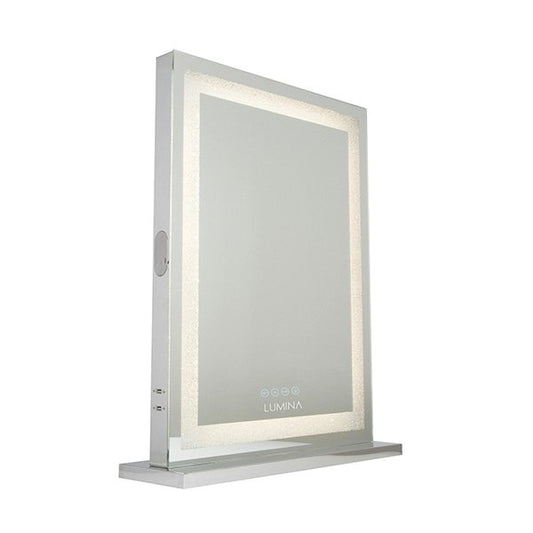
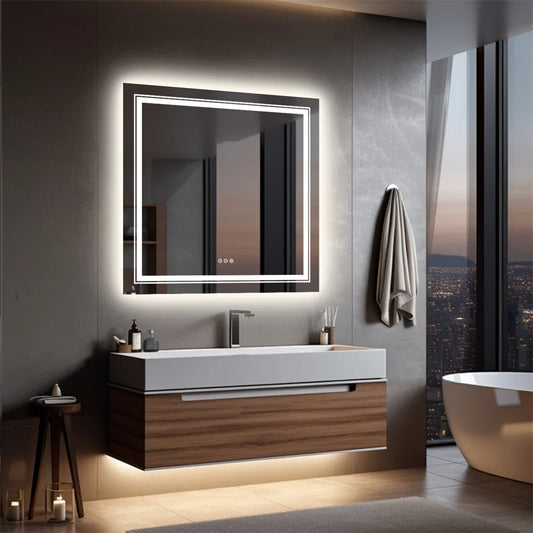
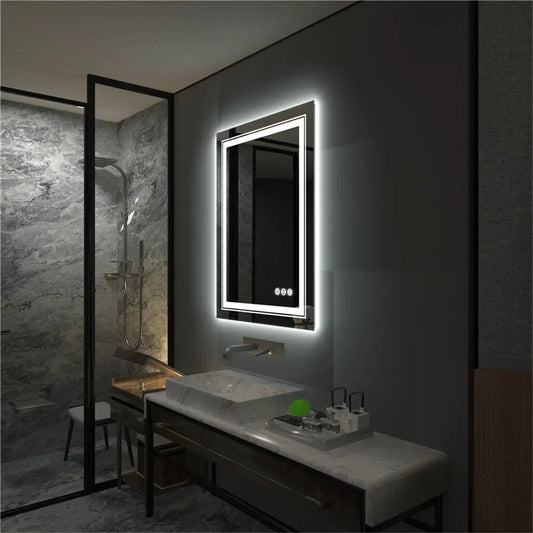
For a professional, makeup-artist-worthy result, explore mirrors with integrated LED lighting. These combine the best of both worlds and deliver crisp, shadow-free illumination. For inspiration and ready-made solutions, check them out here—the perfect addition to any DIY dresser makeup desk.
Selecting the Right Mirror
Choosing the ideal mirror makes a dramatic difference, both in function and style. Consider these options:
- Large Wall-Mounted Mirrors: Mount a generously sized mirror directly above your dresser for a classic, Hollywood-style look. If you rent, opt for a leaning mirror or attach it securely with removable adhesive strips.
- Frameless or Minimalist Styles: Sleek, edge-to-edge mirrors make small spaces appear larger and channel a modern, airy vibe.
- Mirrors With Storage: Some mirrors offer hidden shelves or hooks on the back for holding brushes and trinkets—great for maximizing your station’s utility.
- Lighted Vanity Mirrors: Crystal-detailed or ring-lit styles instantly upgrade your upcycled dresser into a glam station. Enjoy the ease of adjustable lighting at your fingertips and always see your makeup in perfect detail.
When installing, hang your mirror at a height where you are perfectly centered while seated or standing. For those after the ultimate “glam station” effect, don’t be afraid to go big or bold—oversized mirrors or multiple smaller mirrors in a grid can amplify light and drama.
Accessorizing the Vanity Top
The newly transformed surface of your dresser will not just showcase your personal style, it can also be incredibly functional. Layer trays, perfume stands, or a petite jewelry box for day-to-day essentials. Incorporate a few petite potted plants or cut flowers for vibrancy. Most importantly, keep the surface clutter-free so your upcycled dresser into vanity always looks inviting, not chaotic.
If you’re looking to save time and get the luxury-glam effect with less DIY, explore this well-appointed vanity and mirror package for instant polish and maximum function.
Organizing Drawers
One of the biggest perks when you transform a dresser to glam station is storage. Dresser drawers are tailor-made for accommodating makeup palettes, skin care, hair tools, and all your beauty treasures—but without strategic organization, chaos can take over. Here are my favorite ways to keep your new DIY dresser makeup desk tidy, accessible, and beautiful inside and out.
Drawer Layouts for Maximum Efficiency
Begin by declaring zones. Dedicate one drawer to everyday makeup, another to skincare, and perhaps a third to hair tools or accessories. Reserve the uppermost drawers for items you reach for daily, and use deeper drawers for bulkier pieces or seasonal products. This hierarchical approach minimizes morning rummaging, while keeping your vanity feeling curated (not cluttered).
Use Organizers and Drawer Dividers
Upcycled dressers, while charming, rarely come with built-in compartments. Invest in clear acrylic organizers—like trays with multiple sections or stackable bins tailored to fit your specific drawer width. Smart organizers corral brushes, eyeliners, blush, and more, so every product has a home and nothing gets lost. For a chic, modular solution (ideal for deep or wide drawers), see this clear acrylic drawer organizer set—it’s perfect for keeping powders, compacts, and lipsticks accessible and dust-free.
Custom DIY Drawer Dividers
If you love a personalized touch, create bespoke dividers using balsa wood, cutlery trays, or even rigid foam board. Measure the interior of your drawers and craft compartments sized for specific items (think eyeshadow palettes, foundation bottles, or tiny compacts). Lining drawers with velvet or non-slip contact paper doesn’t just protect your dresser—it adds a boutique feel to your everyday routine.
Label for Luxury
For a true professional touch, label each drawer or use dainty tags, especially if multiple people use the vanity. Gold foiled stickers or custom script decals pair beautifully with clear organizers, ensuring your new glam station stays Pinterest-perfect. This tiny upgrade makes a big difference for maintaining order long-term.
Hidden Power Solutions
Don’t forget about cord management! Hair dryers, curling irons, and phone chargers all need easy access. Consider drilling discreet holes at the back of a lower drawer to thread cords, or tuck a small extension cord or charging hub inside. This keeps your surface streamlined but all your tools within arm’s reach.
Thoughtful organization transforms your upcycle dresser into vanity both inside and out, ensuring your new beauty station functions just as beautifully as it looks.
Your Personalized Glam Station Awaits
There’s a unique joy in breathing new life into an old dresser and watching it take on dynamic new purpose as your signature vanity. This project is more than just a budget-friendly way to organize beauty essentials—it’s a creative statement that reflects your style, daily rituals, and ingenuity. Whether you upcycle a dresser into a modern vanity with bold color, elegant hardware, sophisticated lighting, or clever storage, the secret lies in crafting each detail to fit your world.
From selecting the ideal dresser, prepping and painting, curating on-trend hardware, and adding mirror and lighting upgrades, to infusing every drawer with custom organization systems, you’ll have built not just a DIY dresser makeup desk—but a dream glam station all your own. Your morning routine is about to change for the better, with everything within reach, beautifully styled, and tailored precisely to you.
To expedite your project with maximum wow-factor, browse curated vanity setups and storage accessories for every budget—explore this inspiring selection here and get started on your transformation today.
Key Takeaways:
- Choose a dresser with the right size, structure, and configuration for your vanity needs
- Refinish, paint, and swap hardware for an instant modern update
- Add statement-making lighting and mirrors to boost function and glam appeal
- Organize every drawer for seamless daily routines and stress-free beauty
- Personal touches—like velvet liners, labels, and hidden power—make your glam station feel truly bespoke
Ready to transform your daily beauty ritual? It all begins with a single dresser and your vision. Happy upcycling!